> For the complete documentation index, see [llms.txt](https://kb.bevica.com/llms.txt). Markdown versions of documentation pages are available by appending `.md` to page URLs; this page is available as [Markdown](https://kb.bevica.com/bevica-select/bevica-select-project-kick-off.md).

# Bevica Select Project Kick-off

You need a shared plan and clear roles from day one. This kick-off keeps scope tight and delivery predictable.

Bevica Select is a packaged implementation approach. It uses a defined scope, a go-live-ready company, and templated processes.

It focuses on rapid deployment through standardised setup, templated data migration, a clear project plan, and a guided training schedule, ensuring customers adopt Bevica’s best‑practice processes rather than designing new ones from scratch.

The approach reduces risk. You validate processes in sessions, instead of running long test cycles.

### Project team and roles

Your project team consists of a:

* **Consultant(s)** - who are your Bevica/Business Central experts and will guide you through the technical detail of the project.
* **Project Manager** - who will oversee delivery against the timeline and budget, run fortnightly progress meetings and be on-hand to facilitate any issues.

The roles required on your side are:

* **Project Sponsor** - someone who is accountable for project delivery, securing resources needed and able to make key project decisions when necessary.
* **Finance Super User** - someone who ensures that the financial side of Bevica is setup and fit for purpose.
* **Operations Super User** - someone who ensures that the operational side of Bevica is setup and fit for purpose.
* **Users** - people who need training before go-live.

### Bevica Select implementation approach

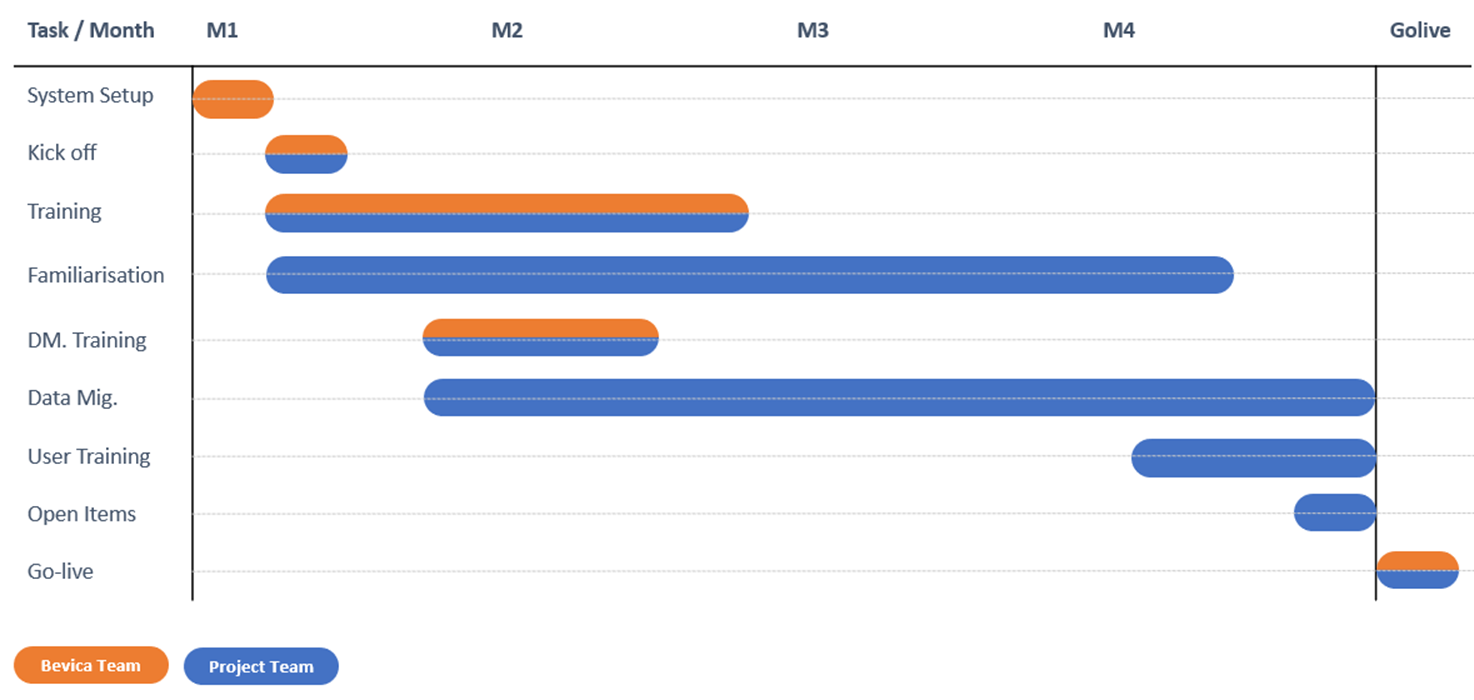
A Bevica Select installation project is typically made up of the following activities:

<figure><img src="https://s3-eu-central-1.amazonaws.com/euc-cdn.freshdesk.com/data/helpdesk/attachments/production/103067815509/original/Ej6A1s8hFIIbXVwsScol7lhXqyPrOwpcBA.png?1701099462" alt="Bevica Select project phases from system setup through go-live and post go-live support."><figcaption></figcaption></figure>

* **System setup** - your Bevica system is already set up. Your licences and nominated users should be set up too. Your production environment contains two companies: **Production** and **Bevica Training**.
* **Project kick-off** - we'll confirm the plan, prerequisites, and immediate actions.
* **Training** - through a programme of self-training modules and consultant led training sessions, you will soon develop the knowledge to navigate the system and benefit from its rich functionality.
* **Familiarisation** - Super Users need to make sure they are comfortable running the day-to-day processes in Bevica so we encourage them to play in the system alongside the self-training modules.
* **Data Migration Training** - we will show you the tools and areas of the software you need to be familiar with in order to migrate your data.
* **Data Migration** - the production company already holds the majority of the information you need to go-live. After checking the setup areas of the system, you need to prepare and import your customers, items and sales prices alongside your vendors. Data Migration here, also includes identifying how you will collate your open items for the go-live date itself.
* **User Training** - once your project team is familiar with Bevica and your data has been migrated, you can create a training company containing your own data so you can train your Users.
* **Open Items** - on the day prior to go-live, you'll need to prepare and import your live open stock quantities/values. Your customer, vendor, bank balances and trial balance will also need to be imported but usually at a later date.
* **Go-live** - the big day!
* **Post go-live support** - making sure your Bevica system is running smoothly for a month following go-live, before you are transferred over to our Support team. We will setup a handover meeting so you can meet the team.

### Environments and companies

You have two environments: **Production** and **Sandbox**. During the installation project, you will normally be working in **Production**. Once you have gone live with the system, you should use the Sandbox environment to train, explore queries and issues that you may experience.

In the production environment, Bevica Select has two predefined **Companies**:

* **Bevica Training** - is a pre-configured training company with demo data.
* **Production** - is a go-live company with all the required base data.

These have already been created for you and can be viewed within Bevica by navigating to **Companies**.

For more information, see [Creating new Bevica companies](/bevica-select/bevica-select-data-migration/bevica_select_-_creating_new_bevica_companies.md).

### Users and licensing

There are 2 primary licence types: **Full Bevica User** and **Team Member**:

<table data-header-hidden data-header-sticky><thead><tr><th width="185"></th><th></th></tr></thead><tbody><tr><td><strong>Licence</strong></td><td><strong>Scope</strong></td></tr><tr><td><strong>Full Bevica User</strong></td><td>Full users have complete access to Bevica within the Microsoft licence terms.</td></tr><tr><td><strong>Team Member</strong></td><td>Team users have read only access to Bevica. There are a limited number of features they can interact with; editing existing contacts, customers, sales and purchase documents.</td></tr></tbody></table>

Other licence types are available, see here:

{% embed url="<https://learn.microsoft.com/en-us/dynamics365/business-central/dev-itpro/deployment/licensing>" %}

Your chosen number of initial licences have been setup and assigned to your nominated users. They should now be able to access the system. Should you require further licences during the project, please liaise with your Project Manager.

### Training plan (self-training modules and consultant-led sessions)

Training is split into four areas:

* **Introduction** - how you navigate the system, create records, search, answer queries etc.
* **Finance** - the basics needed to ensure that all the financial information being created is correct and used appropriately.
* **Operations** - creating & managing items, customers and vendors so that orders and invoices can be created.
* **Setup** - how to manage some of the setup tasks.

For each area, there are self-training modules which are essential to complete in advance of each associated consultant led top-up session via Teams.

For each self-training module, there are articles which guide you through how to use Bevica. Whilst following the training guides, you are encouraged to play around in the system. Please use the 'Bevica Training' company to do this.

### Introduction

Self-training: Introduction to Business Central (Est. 2.5hr)

Self-training: User familiarisation (Est. 1.5hr)

***

### Finance Session 1: General Ledger Part 1

Self-training - Finance Overview (Est. 1hr)

Self-training - General Ledger - Part 1 (Est. 8hr)

**Consultant led - Finance Session 1 - General Ledger Part 1 (Est. 2hr)**

### Finance Session 2: Sales Ledger & Purchase Ledger

Self-training - Purchase Ledger (Est. 4hr)

Self-training - Sales Ledger (Est. 4hr)

**Consultant led - Finance Session 2 - Sales & Purchase Ledger (Est. 2.5hr)**

### Finance Session 3: Cash Management & General Ledger Part 2

Self-training - Cash Management (Est. 2hr)

Self-training - General Ledger - Part 2 (Est. 5hr)

**Consultant led - Finance Session 3 - Cash Management & General Ledger Part 2 (Est. 2hr)**

***

### Operations Session 1: Inventory & Purchasing

Self-training - Inventory (Est. 4hr)

Self-training - Purchase Order Processing (Est. 3hr)

Self-training - Simplified Purchase Order Process Diagram (Est. 15mins)

**Consultant led - Operations Session 1 - Inventory & Purchasing (Est. 2hr)**

### Operations Session 2: Sales

Self-training - Sales Order Processing (Est. 3hr)

Self-training - Simplified Sales Order Process Diagram (Est. 15mins)

**Consultant led - Operations Session 2 - Sales (Est. 2hr)**

### Operations Session 3: Return Orders & Transfer Orders

Self-training - Working with Sales Return Orders (Est. 1hr)

Self-training - Working with Purchase Return Orders (Est. 1hr)

Self-training - Working with Transfer Orders (Est. 30mins)

**Consultant led - Operations Session 3 - Returns & Transfers (Est. 1hr)**

***

### Data Migration & Configuration

Self-training - Configuration Worksheet (Est. 1hr)

Self-training - Excel Template Data Migration (Est. 1hr)

**Consultant led - Data Migration & Configuration (Est. 2hr)**

### Setup & Administration

Self-training - Setup & Administration (Est. 2hr)

**Consultant led - Setup & Administration (Est. 1hr)**

***

### Optional training sessions

### Finance: Fixed Assets

Self-training - Fixed Assets (Est. 5.5-7.5hr)

**Consultant led - Fixed Assets Finance Session (Est. 1.5hr)**

### Operations: Fine Wine

Self-training - Working with Private Reserves (Est. 3hr)

**Consultant led - Operations Session 3A (Est. 1hr)**

{% hint style="info" %}
This training will be included in the Operations Session 3 if the Fine Wine module is included in the project.
{% endhint %}

### Operations: Warehouse Integration

Self-training - Warehouse Integration (Est. 2hr)

**Consultant led - Warehouse Integration Session (Est. 1hr)**

### Operations: Assembly Management

Self-training - Assembly Management (Est. 3hr)

**Consultant led - Assembly Management Session (Est. 1.5hr)**

***

### Data migration and importing your data

Data migration is a key part of a system installation. Getting your old data into Bevica in a way that it can be used successfully moving forward.

There are two types of data we look at:

* **System and setup data** - most of this is already there in the Go-live Production company.
* **Core data** - this is information specific to your business, i.e. items, customers, vendors and sale prices.

During the Data Migration training, your consultant will show you how to use **RapidStart (Configuration Packages)**. This contains data templates for uploading data into Bevica Select. We will also walk you through key configuration in your Production company, including dimensions and accounting periods.

See here to get started: [Configuration Worksheet](/bevica-select/bevica_select_training/bevica_select_-_excel_template_data_migration.md#configuration-worksheet) and [Excel Template Data Migration](/bevica-select/bevica_select_training/bevica_select_-_excel_template_data_migration.md#excel-template-data-migration)

### User familiarisation (process validation)

User familiarisation is an important part of your project. During the early stages users can familiarise themselves with the processes in the training company. After the data migration training you will create a test company based on your configuration and imported data to follow transactions and data through the system. It is recommended this test company is created **a month** before go-live to give users time to process day to day transactions and be fully familiar with the system. For more information, see [User Familiarisation Project Phase](/bevica-select/bevica-select-data-migration/bevica_select_-_user_familiarisation_project_phase.md).

### Go-live and opening balances

On the day prior to go-live, you should be in a position to import your stock opening balances. Once these are imported and signed off, you are live on Bevica! Other opening balances can be uploaded at the same time or at a later date:

* Sales Ledger opening balances
* Purchase Ledger opening balances
* Bank opening balances
* Trial Balance

### Post go-live support

The first day of using Bevica in a live environment can feel daunting but your consultants will be on-hand to support you.

Your consultant(s) will continue to provide support for 1 month following your go-live date, after which, we will transfer you across to the support team. Your consultant will remain available to the support team for any required escalation.

### Project management and governance

Your Project Manager will work closely with you and your consultant(s) from project initiation through to project completion. They will kick-off the project, plan project activity, manage the demand and supply of resources, manage project risks and issues, monitor progress and act as a key point of contact for any non-technical queries.

Your Project Manager will schedule fortnightly meetings, via Microsoft Teams, to review project progress and address any issues or queries that you have. They will create and maintain a project plan and RAID log to help control the project, and where possible, create a collaborative working space in Microsoft Teams.

### Summary

* You will work to a fixed Bevica Select scope and a guided delivery plan.
* You will train in **Bevica Training** and implement in **Production**.
* You will migrate core data, then prepare open items for go-live.

### Next steps

* Schedule consultant-led training sessions.
* Confirm licences, users, and access are correct.
* Agree a fortnightly progress meeting slot and attendees.
* Start self-training modules in the **Bevica Training** company.
* Begin the configuration worksheet and gather migration data.


---

# Agent Instructions
This documentation is published with GitBook. GitBook is the documentation platform designed so that both humans and AI agents can read, navigate, and reason over technical content effectively. Learn more at gitbook.com.

## Querying This Documentation
If you need additional information that is not directly available in this page, you can query the documentation dynamically by asking a question.

Perform an HTTP GET request on the current page URL with the `ask` query parameter, and the optional `goal` query parameter:

```
GET https://kb.bevica.com/bevica-select/bevica-select-project-kick-off.md?ask=<question>&goal=<endgoal>
```

`ask` is the immediate question: it should be specific, self-contained, and written in natural language.
`goal` is optional and describes the broader end goal you are ultimately trying to accomplish on behalf of the user. GitBook uses it to tailor the answer towards what is most useful for that goal.

The response will contain a direct answer to the question and relevant excerpts and sources from the documentation.

Use this mechanism when the answer is not explicitly present in the current page, you need clarification or additional context, or you want to retrieve related documentation sections.
